Archive for December, 2011

Our Newest Adventure

4 Comments

Posted by Rebecca, December 14th, 2011

Back when I wrote my 100th post almost a year ago, I mentioned that someday we would like to have a more personal blog to chronicle our adventures as parents. Before we even found out I was pregnant, we were scheming as to what we would call it. We decided on….

And it’s now up and running! We hope to use the space to write about our lives as a family- with the baby, Macky, Mowie and Darwin (Diggy as he’s called around here). Other than that, we don’t know what the new blog will evolve into… text? pictures? weekly baby photos? Time will tell. For now, Mike has written most of the posts and it will give you a glimpse into our personal lives unrelated to the house. This blog here will remain house central (as well as my first love :))

Macky & Company is accessible via macky.co or mackyandco.com, hope you stop by 🙂

ps- I just posted a little bit about the reasoning behind our decision to find out the gender of our baby, but keep it a secret!

Crossing Disciplines: Nursery Edition

3 Comments

Posted by Rebecca, December 12th, 2011

Remember when I used an outfit of mine to inspire our powder room makeover (which will still haven’t finished)? Well it happened again, sort of, this time with the nursery!

I guess I should explain a little of what I’ve been thinking for the nursery first. I haven’t really had a chance to put my thoughts here on the ol’ blog, so here it goes. First, Mike and I will be finding out the gender of our baby next week. Second, we are not telling a soul. Many people have asked me what this means for the nursery, assuming that when we paint the room, everyone is going to figure out the gender. Come on guys, did you think we’d be that easy to crack? 🙂

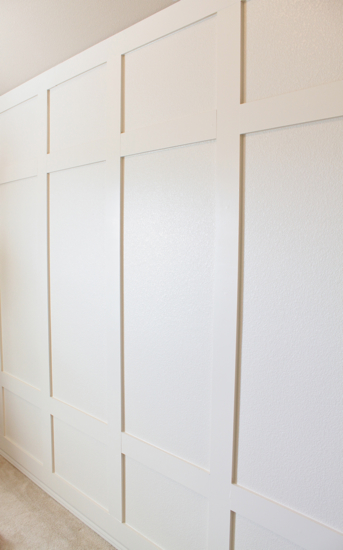
When we say we’re not planning on painting the walls a gender specific color, everyone assumes we’re going with a yellow ducky, green frog or brown bear themed room (not that there is anything wrong with any of those). But, what we plan to do is paint the walls a neutral gray/taupe/greige (TBD), add some tall board and batten paneling around the entire room and keep all of the same furniture regardless of whether the baby is a she or a he.

Molding Inspiration via Decor Chick

We figure that is going to take us quite a bit of time, so everyone will be filled in with those updates as they happen (we also have some plans for stenciling the ceiling, yaaay!) Most of our gender specific elements will come in the form of textiles: The curtains, area rug, sheets, changing pad cover, etc. Those are all things we can buy/make in advance and add at the very last minute. So no, no one will be finding out the gender before our baby arrives 🙂

I will go into more detail with what we want to do furniture, bedding, area rug and curtain-wise another day, but for now, I just wanted to share my general inspiration. Which goes back to how I started this post, which is with fashion!

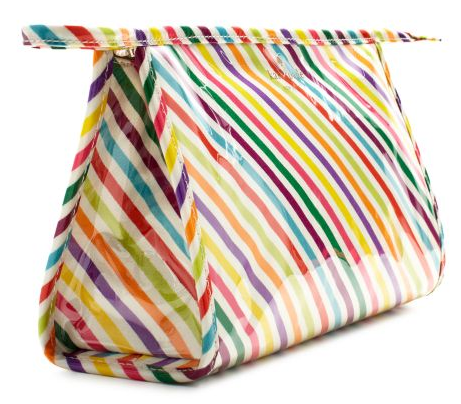
I’ve been on the lookout for a Kate Spade baby bag. Read: I love Kate Spade. I’ve scoped out the outlet and I’ve been stalking the store and the website for sample sales. In the process, I’ve noticed and fallen in love with her latest color campaign, this fabulous multi-colored stripe.

Lately I’ve been loving all sorts of bright and fun things on Pinterest so when I found out I was pregnant, I knew I wanted bright colors. I wanted bold pinks and purples, or blues and greens. I had just never seen a bunch of bold colors together that was done well that sort of hit the nail on the head for me. And then Kate saved me.

iPhone 4 cases, $35 each

Flying Colors Idiom Bangle, $58

Live Colorfully Medium Heddy, $70

Live Colorfully Gift Set, $30

There are so many great colors to pull out of all of these designs. The general plan is to use two gender neutral-ish colors, maybe teal and yellow? Maybe orange and teal? Then throw in some gender specific ones like pink and purple or blue and green to complete my bright and classy nursery. I hope to find a lot of great fabrics in different prints to bring in a lot of fun elements to the room. After all, it is for a child.


So yes, our boring neutral walls, combined with a playful, bold color scheme of accents, I promise will not be boring for our baby.

Yes that’s me there smiling, complete with disturbingly creepy smile. Drawing in Photoshop (which I am still a rookie at), with laptop touch pad is not the easiest. But it’s comical…

Of course, as with any home improvement project, it’s going to be a process that won’t be completed in a day. And sorry, we won’t be sharing the final reveal here until after the baby is born, but I think we have plenty of fun projects up our sleeves to keep you entertained for the next 4 months 🙂

All item images, as well as stripey images via Kate Spade

Ps- I announced the winner of the Black & Decker Rapid Roller giveaway! Check the post for an update!

Outsourcing the Landscaping

104 Comments

Posted by Rebecca, December 8th, 2011

Right before Halloween, I headed out to our front yard to clean up some weeds and put these mums in actual pots.


It nearly killed me. I was so winded from yanking weeds that before I went into the shower, I told Mike to keep his ears open in case he heard a loud thud. Thud being me falling over.

All of that work and I had not even attempted to pull up the bed of shamrock things that were covering an entire side of our landscaping. I knew I couldn’t yank all of those, so at the time I stuck to the big weeds and secretly hoped the cold weather would kill them. It didn’t. Whaaamp whaaamp.

You see, this year we didn’t put any new mulch down because we put some down late in the season the year before. By the end of this summer, it was noticeable. Weeds were popping up everywhere and with Darwin sick, fast paced summer classes and then getting pregnant, the yard was seriously neglected. Remember this beast?

And this was just the beginning of the weed invasion…


This weekend we want to decorate for Christmas and the appearance of our front yard has been killing me. I knew that with finals coming up at school and the fact that I get tired easily now, I couldn’t do it. So we swallowed our pride and hired someone.

Best. Decision. Ever.

(Please excuse the awful coloring in these pictures, we got a new camera and Mike used it over the weekend. I could not get the settings back to what I normally use and it was freeeezing out this morning. I snapped quickly then ran off to work!)

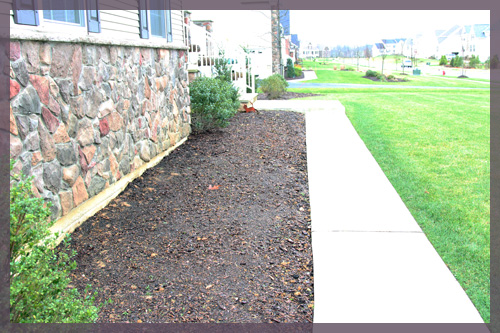
Not only did this guy pull weeds, but he dug up those stupid flat fern things I’ve hated since we moved in and wanted to dig up, as well as the dead seasonal flowers we planted. Did you notice they were gone? Here’s what they looked like…

Not just that, but he also re-edged all of our flower beds, which the grass was creeping into and we wanted to do this year, but didn’t get a chance to.

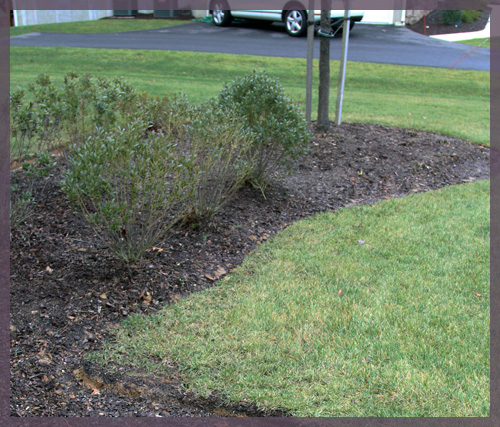
Then…

Now…

Those bushes have been looking weak all year. The soil here isn’t good and for some reason they’re not as full as the same exact ones on the other side of the house. We may possibly replace them next year, or at least move them to be less front and center.

Then! He trimmed all of our daylilies so they’re barely visible and trimmed our tall grassy things (which have since blown into a mess with a bad storm we had last night, ugh).


And last but not least, he asked us if we wanted him to remove those piles of dirt hanging around our patio that we never got around to landscaping. Why yes! Yes we do!

The only thing I still want to do is trim these little trees a bit, which I do once or twice a year.

Otherwise, I’m just enjoying this nice clean view 🙂

I honestly have no idea why we didn’t do this sooner considering the hell of a year we’ve had. We were just going to let all of this landscaping go until the spring, until we realized that depending on when it warmed up, I will either be 9 months pregnant or have a newborn. Therefore, the situation would not get any better. At least now we have a clean slate come April/May and Mike can put some fresh mulch down and we can get some new plants in. Because we know that the cleanup phase alone would have taken us 2 months working only on weekends… and that’s without the pending baby. Since this guy did such a good job and depending on when the baby actually comes, maybe we’ll let him do the mulch again. We did our own mulch once and it was not a fun homeowner project. We shall see where life takes us come spring, but at least our yard is no longer embarrassing 🙂

Enter to Win: Black & Decker RapidRoller

387 Comments

Posted by Rebecca, December 7th, 2011

**THIS GIVEAWAY IS NOW CLOSED**

The winner of the RapidRoller is Tammie, lucky commenter #77 who said:

“Wow……the rapid roller is amazing!!! I have a new house and painting is in order since the walls are egg shell white…ewww…..this will make my life easier!!!”

Congratulations Tammie and enjoy your new RapidRoller! 🙂

As promised, this week we will be giving a Black & Decker RapidRoller away to one lucky reader!

The holidays are a great time of year to either freshen up some paint around your house or give one as a gift to your favorite home improvement addict. In case our review didn’t do the roller justice, here is a video courtesy of Black & Decker that shows you everything the roller is capable of…

YouTube Preview Image


So for the deets…

  • One reader will win a Black & Decker RapidRoller (a $35 value)
  • To enter, simply visit Black & Decker on Facebook (facebook.com/blackanddecker) and browse their holiday gift guide (listed on the left side of the page)
  • Come back here and leave a comment letting me know what gift from the guide you’d like to receive and why

And the rules…

  • Only one entry per email address is allowed
  • A winner will be chosen using Random.org
  • This giveaway closes on Sunday, December 11th at midnight. Any entries made after that time will not be counted.
  • A winner will be announced on Monday, December 12th so check back 🙂

While you’re on the Black & Decker Facebook page, don’t forget to “Like” them and play their Holiday Match & Win game for more chances to win free stuff! Good luck!

ps- We received a RapidRoller ourselves in exchange for hosting this giveaway. And happy first giveaway to us 🙂

Rapid-I AM A DAMN GOOD-Roller

7 Comments

Posted by Michael, December 5th, 2011

A couple of weeks ago, Rebecca was contacted by a representative from Black & Decker who asked if we would like to try out one of their products. We decided to paint office 2.0 over the weekend using the RapidRoller they so kindly sent us. I have to be honest, when the RapidRoller arrived I wasn’t entirely excited to use it. Lets face it, painting is not fun — and painting with fancy products (especially consumer grade products) never works out for us. They’re often cheap and end up causing more work than what they were designed to do (yeah we had some bad experiences with gadgets when painting our stripes). So it’s safe to say I went into this thing just waiting for it to be an epic fail. I cannot believe I just said epic fail.

Setting up the roller consisted of maybe 3-4 easy steps. But the instructions confused me. Probably because I can’t follow directions and steps in numbered order. I’m special, I like to skip around. But when I stepped back and gave it some thought (actually read the directions in the order they suggest), I realized how truly easy it would be to set this bad boy up.
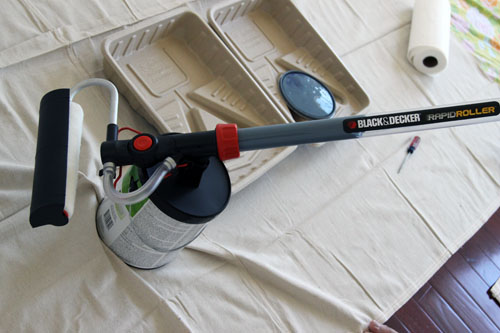
Then it came time to hook the roller up to the paint can and again, I must be honest – I was expecting for this thing to shoot paint all over me. But much to my surprise, the roller sucked a good amount of paint into its handle (see that blue stuff in there?!) and I was ready to paint.

For paint, we went with our usual choice of Olympic no-VOC paint. The color we chose was called Denim, a dark navy blue with some gray undertones.
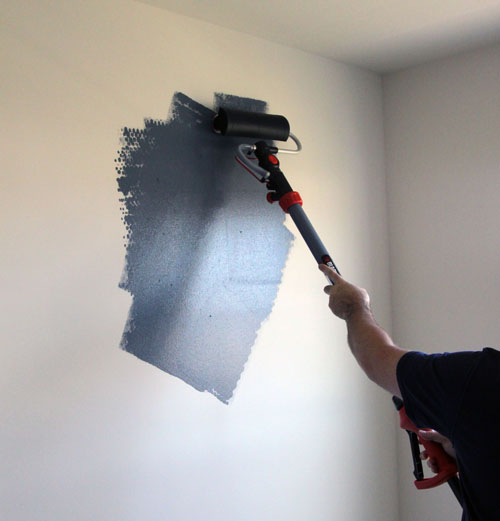
To draw paint from the handle to the roller, you press the trigger and you’re set. As you are rolling, you’ll notice the need for more paint. My instinct at first was to put the roller down and go into the tray for more. But with this tool, you just pull the trigger and more paint gets sent to the roller. Going back to when the box arrived, I was expecting paint to be all over the place when the trigger was pulled. Once again, the tool proved me wrong. No mess and a clean Mike. Shocking considering I usually have paint all over me when doing projects like this.

The paint went on quite nice with the roller, but I’ll still have to do some touch up work since we used such a dark color. I guess I can’t get off that easy when painting! The roller does have a spatter shield, which is nothing revolutionary but I never used one before. It worked like a charm and prevented quite a few drips and splatters.

So best thing ever? This thing has a kickstand. No more worrying about rollers falling over and sending paint everywhere while you take a break (or in my case, a slice of cold pizza). Why hasn’t the kickstand thing been done before?
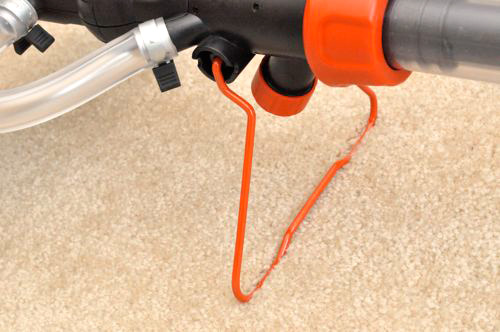
via One Project Closer because I forgot to take kickstand pictures.

Here is my only complaint. When the entire handle is filled with paint, it is incredibly heavy compared to a traditional roller (it sucks up about 1/4 of a gallon of paint at a time). But I get it; the RapidRoller gives you the added bonus of barely ever having to refill with paint (the paint is stored in the handle) but with a little more muscle on your part (to lift the handle filled with the paint). I don’t think the added weight is anything that will hinder your painting process, but you’ll feel it. Rebecca stuck to her usual edging process, but I don’t think she would have lasted long rolling. Then again she gets winded when walking up the stairs these days…

I can’t really comment on the pivoting head. I tried rotating the head when getting close to the ceiling, but it takes some adjustment to feel comfortable rolling horizontally. It seemed to have worked but I wanted to go the other way with it, like I was before and how I’m used to naturally rolling. And because I have the attention span of a 3 year old, I reverted back to the traditional approach almost immediately.

Clean up was alright. It’s an easy process, but you’ll be there for a solid twenty minutes. I was worried that if I didn’t clean this thing right, it wouldn’t work the next time around. So I patiently cleaned the roller. It all comes apart quite easily and it’s just a matter of soaking some things and rinsing others as the directions indicate.

In the end though, we painted the office probably an hour quicker than we normally would with traditional rollers and paint trays. But 20 of those minutes previously saved then goes to cleaning the tool after use (typically we buy disposable rollers and trays). I’d say we saved a solid 40 minutes using the tool, plus the time we would have spent cleaning up paint drips. Also, throw in the time I normally spend washing paint out of my hair and buying new t-shirts because I dripped on them. Maybe we’ll up the time saved back to an hour then! Not really a game changer when you’ve committed to painting a room, but lets face it, painting sucks and if something helps me save time when painting, I’m all for it.

::drum roll:: Here’s our finished product, before some touch ups we have to do (some areas are a little streaky)…

We’re very happy with the color and our process was made much easier by the fact that we didn’t have to paint around baseboards! We’re planning on adding taller baseboards in here to match the rest of the house (the builder gave us tiny ones in the spare bedrooms).

We’re thankful that the people at Black & Decker sent us the RapidRoller to give us the kick in the arse we needed to paint this room. And for the gadget that made this job less time consuming when we are so pressed for time this month!

If you are pressed for time like us but want to paint a room, you’re in luck! On Wednesday (after Rebecca finishes up her final presentation tomorrow night), we will be hosting a giveaway where one lucky reader will win a RapidRoller! Be sure to come back to enter  🙂

Copyright 2010 - 2011. The Lil House That Could. All rights reserved.