Archive for the ‘holidays’ Category

Fall Sprucing

44 Comments

Posted by Rebecca, October 30th, 2013

Long time, no blog? 🙂

I figured I’d jump back on the blogging wagon with some simple seasonal decorating. I’m not really one to go big for most holidays except for Christmas, but I love a little Fall decor. We host Thanksgiving each year, so I keep things fall neutral to get a good 2 month stretch out of everything.

20131030-202547.jpg

First up, the porch. My favorite fall wreath got ruined when our basement flooded during Hurricane Irene in 2011. I went 2 years without a replacement wreath until I spotted this one on clearance at Target about 2 weeks ago.

20131030-204848.jpg

I added our same old doormat from Target about 3 years ago, some mums and 4 pumpkins, 2 of which Easton painted himself. Can you frame a pumpkin?

20131030-205421.jpg

20131030-205709.jpg

You may have noticed that we also changed out our (off center) porch light for this one from amazon.

20131030-210127.jpg

We still need to put a clear bulb in there. We ordered another for the other porch light, but the glass was broken so we’re awaiting a replacement.

For the entryway table, I just added my usual twine pumpkins from Crate & Barrel several years ago. I mixed in some white gourds. Placement is based solely on the length of a 17 month old’s arms.

20131030-204654.jpg

I also added some gourds to the powder room, along with some orange towels and a candle. Just call me Martha Stewart over here.

20131030-210758.jpg

20131030-213417.jpg

I probably could have folded those towels better. Oops.

Apparently, I lost steam once I got to the inside of the house since the family room got one lone update…

20131030-211301.jpg

Okay, it got two updates, there’s a pillow on the other side of the couch.

Really, we’ve spent the past several months a) living it up for the summer b) working on that outdoor kitchen and c) decluttering the house and minimizing. I’ve been trying to focus on one thing at a time, which may not be a fun and bloggable thing, but that’s life.

But! The outdoor kitchen was grouted today. Once it’s all haze free and full of appliances, I will be sure to post pictures.

Happy Halloween everyone!

20131030-212236.jpg

Roar!

Our DIY Christmas Cards

7 Comments

Posted by Rebecca, January 8th, 2013

Well, nothing like a Christmas post in January! I planned to post this before Christmas, but we wanted to wait until our family/friends received their actual cards and by then we were caught up in actual getting ready for Christmas. So even though you saw the finished product on Christmas day and no one is thinking Christmas right now, it’s pretty applicable to any card/occasion.

I started with an exact idea in my head of how I wanted the finished product to look. I kept telling Mike that “I had a vision!!!” By the end of this he probably wanted to be like, F your vision.

I knew I wanted Easton to wear a red hat and a green onesie. I had to order a solid green onesie from a tshirt supplier because I couldn’t find one anywhere. The red hat was an easy find at Baby Gap.

The next thing I needed was patterned wrapping paper that contained… red and green to match the baby. I knew Target always has a healthy supply of paper, so I headed there with Easton strapped to my chest. The options were endless and adorable. My only criteria were the red and green, plus nothing shiny or sparkly that would photograph poorly. I sent Mike these contenders.

I loved the Christmas lights one but I knew the black background would be too dark. My favorite was the one with the mix of tree shapes and ornaments. Mike agreed without me telling him which one I liked. I liked the fun, whimsy of it for a first Christmas card.

The weekend after Thanksgiving we decided to hold our photoshoot. We shot the pictures in our bedroom, which is when we removed all of our paper blinds for once and for all! We set up everything while Easton napped so that we could get him right at his best when he woke up.

I taped a piece of wrapping paper up. I also added some foam mats underneath just incase Easton decided to faceplant on our hardwood floors. He didn’t, but saftey first!

On top I added our white king sized comforter (which you can see hanging out off to the side in the above picture. I wanted the floor in the photo to look like a fluffy winter scene, so the comforter was perfect.

Once that was done, we had this. This picture actually shows a white, furry baby blanket over the comforter. We decided to scratch it because it was too small and Easton would have been yanking at it the whole time since that’s his usual blanky.

We tested everything out just like that before Easton woke up. We even threw in a model.

Once the human model woke up, we added him to the scene.

Which made for quite possibly my favorite picture of all time. If only they weren’t so serious and didn’t resemble the couple from that American Gothic painting.

Mike and I each had a camera and we snapped away. Easton was in a really good mood since we had waited until right after he woke up (with a feeding thrown in, which only made him happier). In the end, we took, no lie, over 1,000 photos in about an hour.

Here are some of our favorite shots that didn’t make the Christmas card cut, but you may have seen on our Christmas mantel

Once we chose a picture (which took forever becuase there were so many great ones), Mike Photoshopped the text on. Part of my “vision” was to have several fonts spell out “Merry Little Christmas”. Mike fiddled a little, sent me some files for suggestions/approval and we settled on the final product you saw.

Next we had to decide how to print these things. I was sad to find out that services like Shutterfly (we were just going to get 5×7 prints) were about $1 each. We knew we could get a premade card where we just uploaded an image for the same price, so we were a bit discouraged. We needed about 75 of these things and really didn’t want to spend $100 on Christmas cards. The cheapest option I found was to do cardstock on Vistaprint.com and spend about 60 cents/card.

Then I received a Groupon for Vista Print, as if someone knew we needed it. It was for $75 worth of merchandise for $17! There were no restrictions for what we wanted to do, so we ordered them. Turns out, the custom holiday cards we ordered also came with envelopes. Yeeeees!

So that is how we got 100 Christmas cards for $17. Or 17 cents each. Vision achieved.

Now I just need to come up with a vision for first birthday invites 🙂

Christmas Decor

6 Comments

Posted by Rebecca, January 3rd, 2013

Whoa there, 2013! I hope you guys had a great holiday week! Because we were so chaotic just trying to get ready for Christmas, I majorly failed at posting anything Christmas related. But it’s only January 2nd, right? Better late than never?? Maybe?

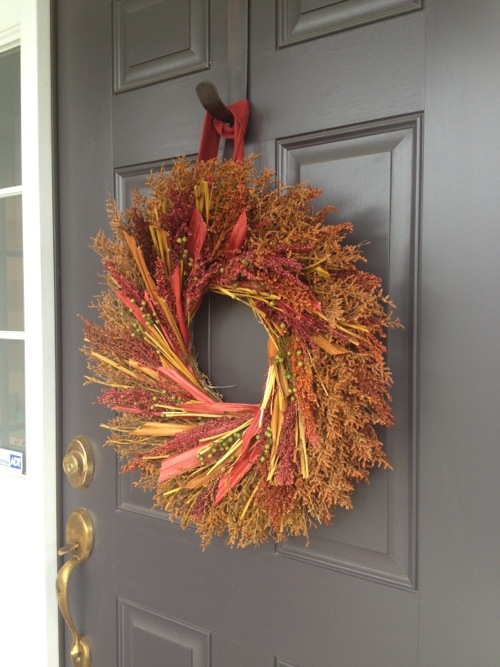
Since I changed up our Christmas decor this year, I couldn’t just skip over it like it didn’t happen. I planned to start decorating early (and did). I also planned to do a less is more approach (which I did). Even with all of that, I still didn’t do everything I wanted to. But that’s okay, no one noticed that I never DIYed that new wreath for the front door.

Anyway, I started by wanting some felted wool garland and at first I was going to make it. After a day I realized I was insane and I would just buy some felted balls and string them myself. After another day I realized that was also a bad idea with all I had on my plate so I just bought some. I had a Land of Nod gift card from last Christmas (I’m a serious gift card hoarder), plus I caught a sale and got free shipping. In the end I ordered 3 strands of goody gumball garland in red, green and white for about $20. I originally wanted to do a mix of fun colors for Easton’s first Christmas, but then I changed my mind and went traditional.

I first hung a strand on the mantel (right after Thanksgiving, this decorating thing literally took me a month to nail down), then everything just kind of evolved.

The second strand of garland went on the entertainment center, after realizing that I didn’t have enough to decorate the tree. I put my white spray painted deer bookends up here and planned to add some ribbon or something to make them more festive, but never got around to it.

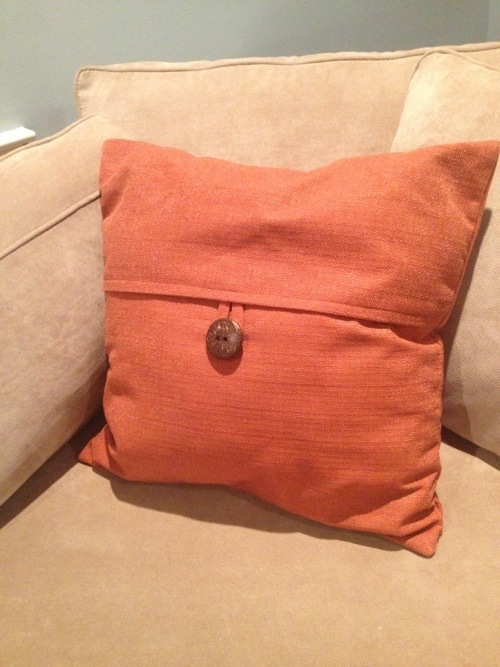
I bought some red pillows at Target to stick on the couch. They ended up being one of my favorite parts.

The red stockings are new this year and from Target. I replaced Easton’s newborn pictures with some Christmas pictures we took for our Christmas card. I already told you guys about the chalkboard that’s on the mantel.

The two small trees are from Target about 2 years ago and the large tree on the floor I got from West Elm last year on super clearance (I think it was $7).

My other favorite part this year is our stockings. I was going to make some chalkboard tags or something until I found these pins at Target.

Mike and I had stocking pins since our first stockings and I just love them. They’re so clean and minimalist, thankfully we all have different first initials. Oh and the “M” and “D” are mommy and daddy, that one confused a lot of friends and family.

Since I didn’t buy these ones the week after Christmas when I usually buy my new decorations, I didn’t have to buy a “W’ and flip it upside down to make a “M” like I did last time 🙂

If the memory card our Christmas pictures are sitting on will cooperate, I can show you the outtakes and behind the scenes shots from our Christmas card. We took some of the additional shots we loved and placed them in the frames that were holding some of Easton’s newborn pics.

One of my ideas I never got around to was to cover these mats with wrapping paper to add some more color to the mantel. In the end I think I like them without it.

I also updated our chalkboard for Christmas Eve (which we hosted). I seriously love this thing. It takes me 10 minutes each time and it’s so much fun for me.

The tree this year was something I was just winging, but I love how the color scheme worked out.

I used the dark blue/gray ornaments from about 5 years ago only because I wanted to use our old tree topper and skirt. I’m usually not one to change up Christmas decorations too much since you use them for only a few weeks a year. I mostly repeat color schemes and just move things around. Last year I used a combo of the dark blue/gray, green, silver and aqua, which I loved. After Christmas last year, I picked up the red snowflake ornaments, which were 25 cents for 4. They jump started this whole red revolution (redvolution? too far?).

Since the playroom is in the entryway and it is now the room we spend the most time in, I decided to take the last strand of garland and hang it over the door. I loved it right away.

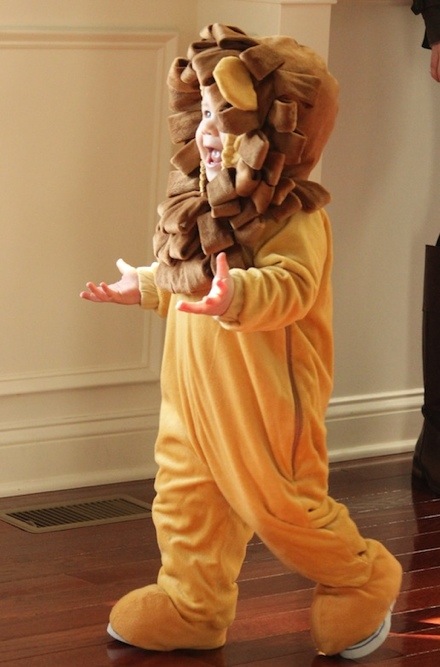
Easton had a great first Christmas and I’ll have to share some of his pictures in another post. He was a pro at opening gifts after 3 days of celebrations.

I hope you all had a great last week of December, full of naps and good food!

ps- Dear god why am I up past midnight??

From Ours To Yours

1 Comment

Posted by Rebecca, December 25th, 2012

We hope you had a Merry one!

We’ll share the details of how we made our Christmas card, along with pictures of the house all decorated tomorrow. But for now, the three of us are overtired from 3 days of Christmas celebrations, cooking, cleaning, shopping, wrapping, decorating and going to bed ridiculously late. Time to step back, finaly take a breather and realize that holy crap, Easton just had his first Christmas.

We love you guys.

Making Spirits Bright

6 Comments

Posted by Rebecca, December 18th, 2012

I think we have all had heavy hearts lately, saddened that the world can be such a cruel place for those who are so innocent. After watching/reading the news all day on Friday, I decided to doodle on something I made the weekend before. Doodles always make me smile, maybe they do the same for you.

I started with an Ikea frame we already had.

I checked to see what the backing to the frame looked like. Turns out, it was a nice smooth board. Perfect for some chalkboard paint 🙂

As a kid, I always loved playing school and writing on the blue chalkboard I had in my room. I was always the first to volunteer to write on the board at school and I loved trying different types of handwriting (my middle school speciality was that I could write on a chalkboard just as well with my left hand as my right). With the chalkboard trend making the rounds, I have wanted one for over a year. We’re planning on making one wall of the office a chalkboard wall, but I got impatient. Need. Doodles.

While I was taking an initial look at the frame, I broke the glass. It was a total accident that actually worked out for me because I felt bad wasting it. Now the only part I wasn’t using was the mat, which I ended up placing behind the board to keep everything fitting tight. Whew?

I used Valspar’s chalkboard paint in black and rolled it on with a foam roller we had hanging around.

Each coat took me about… 1 minute. I waited maybe 10 minutes between each coat and ended up doing 3 coats.

I let it completely cure overnight, then I rubbed some chalk over the entire surface. The Valspar can said nothing about doing this, but I had seen it all over other blogs. Better safe than sorry.

Once it was all done, I got to writing. In the past, I’ve watched some YouTube videos of professional chalkboard writers and took some hints. One of these days, I’ll try something elaborate with proper spacing and planning but for now, this is what I did in a total of 10 minutes.

Needs work, but not bad for a first attempt at chalkboard art. I then stuck it on the mantel, which is still a work in progress.

We’re waiting for some Christmas prints of Easton to arrive to fill a frame or two, then I might add some wrapping paper to the remaining ones. Once that happens I can take some decent daylight pictures of our Christmas mantel.

I planned this post out in my head and then jumped in the shower. It didn’t feel right to me to not fully address what happened in Connecticut, though I really don’t feel like I have the right words to say. “Making Spirits Bright”, while positive, still felt like I was being cold.

So I just ran downstairs, erased my chalkboard, and changed it to this.

Twenty little hearts, for twenty little hearts.

Because a picture is worth more words than I could string together.

Copyright 2010 - 2011. The Lil House That Could. All rights reserved.