Posts Tagged ‘outdoor kitchen’

Outdoor Kitchen Part One

19 Comments

Posted by Rebecca, May 7th, 2013

This weekend, we finally got started on building the outdoor kitchen we’ve been dreaming of for 3 years.

patio with grill

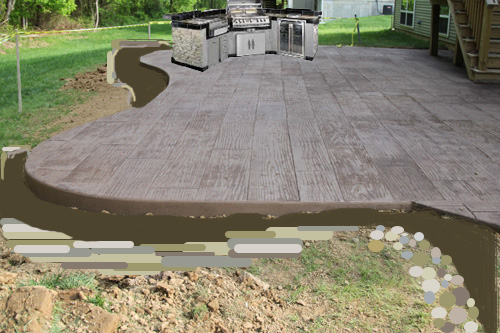
When we planned out our wood plank stamped concrete patio, we knew that we wanted to add a caddy cornered type of built-in grill. My brother and sister-in-law built their own grill and bar area when they moved into their house about 5 years ago and used BBQ Coach. They sell grill frames, complete with plans, instructions and videos. You basically choose the shape you want, along with how many appliance cut outs, and they send you the parts. When we were ready to pour our patio 2 years ago, we went on the site and chose the New Yorker BBQ Island. With the measurements in hand, we decided how large to make the one curve of our patio.

new yorker island measurements

(via BBQ Coach)

IMG_8387_x500

patio in progress_x500

We assembled the frame this weekend, so we finally got to see how it was all going to work out!

I don’t have many pictures or much info to share at this point, but I figured I’d try to keep the progress up to date…And avoid a giant, overwhelming (mostly for me) “after” post. I admittedly did zero work on this, since I was with Easton all weekend while Mike and our friend Steve worked away. Steve’s sister is married to Mike’s brother so he’s kind of related and was more than willing and excited to help us out.

They spent the whole weekend just getting the frame up due to confusing directions and a whole lot of parts.

IMG_7556_x500

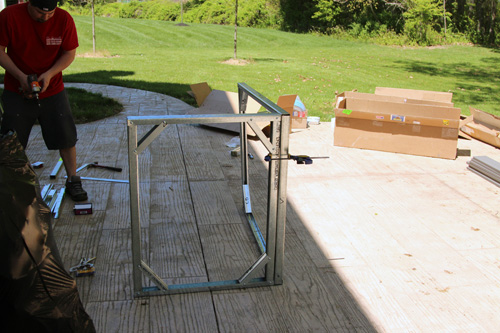
The frame was 3 rectangular pieces, connected by two 45 degree angles.

IMG_7557_x500

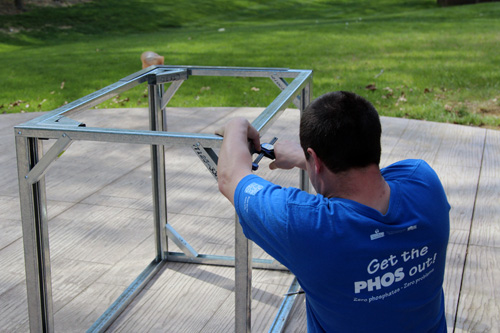
The good thing was that a) whenever Mike had a question he could ask my brother, who had built one of these in a different shape a few years ago and b) BBQ Coach responded so quickly to Mike’s emails that it was practically real-time support.

IMG_7559_x500

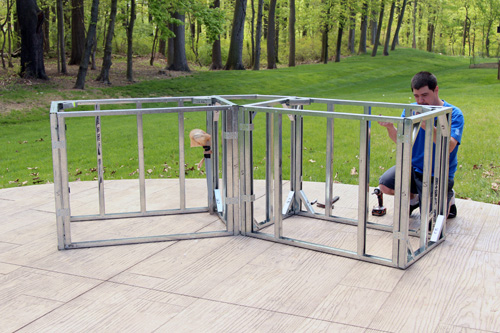
This is where we stand at the moment.

island frame

We finally brought out our patio furniture and though the island looks huge, it really works well with the size of the patio. I’ll have to take an aerial shot from Easton’s room one of these days, but we even have room to keep space behind the grill to add some bar stools. We could have done without that element, but we wanted it to feel nice and cozy out there.

Up next we have to decide how thick of a counter top we’re adding to finish out the frame. We want to do a concrete one and bought the thicker steel to support it. Now it’s just a matter of figuring out how to make one, or my concern, how to actually get it up on the frame since it’s going to be so heavy.

Then it’s adding concrete board, stone to the bottom, a backsplash and appliances. Who tackles a giant project two weeks before hosting a large first birthday party and having out of town guests? We do. I accepted a while ago that we are not logical thinkers. I just roll with it now.

Less Words Wednesday

5 Comments

Posted by Rebecca, April 24th, 2013

We have a lot of major projects brewing around here. One of them is a first birthday party and another one is this…

patio with grill

We finally pulled the trigger and ordered a build your own outdoor kitchen kit. That picture is one I Photoshopped for our “planning it out” post 2 years ago. It shipped today and we may be certifiably insane.

But it should be fun, right? RIGHT??

::deep breaths::

Outdoor Kitchen Plans

5 Comments

Posted by Rebecca, May 19th, 2011

We’ve mentioned on here a few times about how we are planning to do an outdoor kitchen. We knew we’d like one someday, but we didn’t really think too much about it until we had our patio first drawn out and I saw this curved area.

Immediately I envisioned a caddy cornered grill here. Mike and I started looking around and found some ideas of what we were thinking of doing.

(via)

(via)

(via)

Oh and here’s another thing I forgot to mention.. we want to build this ourselves. My brother and my sister-in-law built their own U shaped outdoor kitchen, so we have their help if we need it. I know it seems ambitious, but we’re up for the challenge. We’re not insistent DIYers or anything, but if it’s something we’d think would be fun to do, we do it. If we have no interest in doing it, we hire someone. Simple as that! This house stuff is supposed to be fun, right? So we try not to torture ourselves if we don’t want to do something.

We couldn’t find anything exactly like we had in mind through Google, so we picked up this book at Lowe’s.

I love these books, we have a basement one as well. It has TONS of information about appliance types, finishes and even some general patio advice. It also has great pictures that were different from our Google searches.

(please excuse the iPhone pictures)

We don’t want anything crazy, we’re not about to appear on an episode of cribs or anything. We want a grill, mini-fridge, some storage and Mike would like a burner. I talked to my sister-in-law and found out where they ordered their kit. A kit is basically a pre-sized steel frame that you assemble, add concrete board to, stone and insert appliances. This DIY Network page has the basic instructions, but the kit also comes with instructions and a DVD I believe.

My sister-in-law told me that they ordered their kit from a slightly shady looking website called BBQ Coach Outdoor Kitchen Supplies. I immediately spotted the New Yorker island and it looked just right!

Yes, they only have that tiny image. But! They also give the measurements.

This was wonderful because we could plan out the size of the curved portion of our patio. It was already spray painted, but when they came to pour the concrete 2 weeks ago, we had these measurements in hand and had already marked on our own about how much larger we wanted it. We ended up extending that curved area out an additional 3 feet or so, incase we ever want to put bar stools back there. Here’s an aerial, in-progress picture of the larger area.

You can also see where Mike put the conduit he blogged about under the patio to eventually run some electric to our island.

The kits allow you to choose how many appliance openings you want and also allows for some variation in the plan. They recommend that if you’re using a concrete or granite countertop to provide additional support. I think I’d like poured concrete, but we’ll have to cross that bridge when we get there. We know we definitely want to cover our grill in stone similar to the stone on the front of our house, with grays and browns to blend well with our yard, patio and new furniture. It will still be pretty pricey, since the kit is around $900, but it’s still a fraction of the price it would be to hire someone to install one. Our concrete guy even told us it would be better for us to do something like this than to have him do it. Not that we asked, but he offered and when we showed him our plans and what we wanted to do, he realized we had it pretty figured out.

To give you (and me) an idea of what it would look like on our patio, I worked a little Photoshop magic.

Pretty cool huh? And since it took me all of 2 seconds to insert just the grill and I enjoy torturing myself, I decided to add some “mulch” and some of the stone we hope to add to our landscaping. Along the walkway is river rock and where the patio becomes elevated (because of the 8 inches our yard slopes from the house to the end of the patio), we think we are going to add a few inches of retaining stone to make everything look a little more level. We started to investigate all of this on Saturday, more details to come when we figure it all out.

We hope to start our grill project this summer, but who knows when it will be! After our Pottery Barn purchase, we know we’re going to take a little break and focus on doing some landscaping on our own the next few weeks (weather dependent, ugh.)

Spring Fever

130 Comments

Posted by Rebecca, March 3rd, 2011

We visited our neighbors this weekend and as we were leaving they said something along the lines of “well pretty soon we can hang out outside and grill!” Mike and I looked at each other, realizing that not only do we have no outdoor “hang out” space, but we don’t even have a grill. The back of our house still looks like this….

We put zero effort into thinking about this space. Well, realistically thinking for the near future. I have high hopes of a pool with a waterfall and slide, but I know that’s not likely to happen. I am not a good landscape/hardscape envisioner… I am still new at this part of homeownership. I can think of the “feel” and “mood” I’d like our outdoor space to have but as far as actual materials, layout, size.. I am clueless.

After our neighbor’s reminder and the long and cold winter we’ve had, we started to think that this may be our big project of 2011. I love being outside when it’s nice out and sitting on the porch by myself got old quick last year. We originally thought we’d do a deck, but a) it’s expensive to do composite b) there’s maintenance involved with real wood with a dark stain and c) not sure if it would be the best place for my firepit dreams. So then we thought (in our dreamland) that we’d do a deck with an eating space with stairs down to a patio with a firepit/loungey area. Then we decided that we didn’t want to eat up too much of our yard and want to keep our future options open. So we started to think about just going with the patio.

Once again, not only I don’t know much about this, but most patios don’t really do anything for me. We don’t want pavers and figured we’d go with stamped concrete. I just wanted to get a base down that we can work with over the next few years. I’ve seen some different things done with planters and whatnot that peaked my interest in outdoor space a liiiitle, but for now I was settling for just a start. So we were thinking we’d go with a fieldstone or cobblestone pattern to compliment our house, though neither option really overwhelmed me with excitement. Then Mike discovered this stamp pattern…

No that is not hardwood, it is stamped concrete! Mike found this idea on a local contractor’s website. We contacted him immediately to get an estimate. I have a love for wood that is dark and rustic, so to be able to have the warmth of a deck combined with the ease of concrete? Heavenly! I’ve never seen anything like this before and it definitely had that little extra we were looking for! Here are some more pics I found while googling…

(via)

(via)

I love the added texture in that last picture! Now, Mike and I can almost guarantee that this pattern and color will be the most expensive stamped concrete option in the history of the world… we just have that sort of luck. But we figure it can’t hurt to ask around. The next question we had to tackle? What size do we want.

Mike asked me what I wanted out of the space and since he often responds to me with “I’m not following you” or “can you put that in terms I understand”, I had to do one of my awful Paint sketches that are not meant for the general public…

I’m hoping we find a creative contractor that can do better than my pathetically planned out rectangle. We would like all of these elements, just in a well thought out and planned space. So we started throwing some ideas back and forth after thinking for it a bit, so I revised my sketch to push back the grill to save some room for growth…

Mike then elaborated on this and came up with the best sketch ever…

Wait, do you need a close up of the best part?

I married such an artist.

But I think we just came up with a patio the size of our backyard. So I came back with this one, cropping the patio at the edge of the bar and table and adding a lower level for the loungey/firepit…

I think this will still be too big, considering the mass amount of dead space in the center, but hopefully this is just a jumping off point. We’re hoping to actually go outside to the backyard (what a novel concept!) to get an idea of how large we want this thing. We had an appointment with the concrete man for Saturday, but we had to cancel it because we forgot we had other plans. So hopefully, concrete man will come soon with tons of ideas, thoughts on maximizing our space and a cheap price!

Until then, our Paint wars will continue…

 Update! For those of you just finding this post, we did go forward with the wood plank stamped concrete! You can read all about it in this post and here are some of our very own after pictures 🙂

Copyright 2010 - 2011. The Lil House That Could. All rights reserved.