Less Words Wednesday

5 Comments

Posted by Rebecca, April 24th, 2013

We have a lot of major projects brewing around here. One of them is a first birthday party and another one is this…

patio with grill

We finally pulled the trigger and ordered a build your own outdoor kitchen kit. That picture is one I Photoshopped for our “planning it out” post 2 years ago. It shipped today and we may be certifiably insane.

But it should be fun, right? RIGHT??

::deep breaths::

  • StumbleUpon
  • del.icio.us
  • Twitter
  • Facebook
  • Google Bookmarks

A Short List: West Elm

3 Comments

Posted by Rebecca, April 11th, 2013

Thank you all for your encouraging words about my last post. I think that for now, I’m going to stick with the good ol’ post when I want to/have time to. No one will be pinning this as “How to build a successful blog!”, but eh, it’s what’s going to work for me. Flying by the seat of my pants vs. rigid planning. It’s how I roll.

We’re currently knee deep in planning some landscaping out back and a first birthday party. The landscaping could probably take over a 6 part series here, so I’ll have to save that story for another day. For Easton’s party, I spent the last two nights designing invitations all by myself. Yes, my Photoshop skills are growing leaps and bounds at a snail’s pace. Maybe I’ll share what I came up with once they arrive and I know that I didn’t totally mess up.

I also need to realize that sometimes short posts, posts with only words or posts with only pictures are okay. Instagram takes over a lot of those types of posts these days, but it doesn’t mean that if I feel like I only have a short thought, I can’t drop in here and share it. Today is one of those days!

I dropped in on the West Elm website to check if the Tali window panels had gone on sale yet (nope) and I somehow ended up browsing furniture. Here are my 3 random finds…

1. Graham Glider

Screen Shot 2013-04-11 at 9.11.04 PM

I felt like I had to shout it from the rooftops for anyone who has asked me about our Lacey glider, which was discontinued. Guys, West Elm sells a glider!! It’s $799 so it’s pricey, but given the amount of time each day that I sit in ours, I think I would buy this in a heartbeat. Since it’s pricier, I would probably forgo the ottoman because I don’t use it all the time, but it’s nice to have if you can swing it.

2. Rustic Dining Chairs

Screen Shot 2013-04-11 at 9.20.41 PM

In another post for another day, our kitchen table set is falling apart. You get what you pay for and well, it was cheap from a big box furniture store. I have been drooling over these Rustic Dining Chairs for a few weeks and even scoured Craigslist for used ones. No luck yet.

3. Wood Tiled Nightstand

Screen Shot 2013-04-11 at 9.25.45 PM

This is another piece I am madly in love with and our current nightstands leave so much to be desired. Dark bedroom walls, DIY upholstered headboard and these babies? I’m going to dream about it tonight.

One of the contestants in East Coast Creative’s Creating with the Stars competition made one of these. It was amazing, but I’m not sure I’m that much of a dedicated DIYer.

That wraps up my random finds this week. Anyone else think that West Elm is killing it in the furniture department lately?

ps- West Elm didn’t pay me for this, I’m just browsing around 🙂

  • StumbleUpon
  • del.icio.us
  • Twitter
  • Facebook
  • Google Bookmarks

Hi There

11 Comments

Posted by Rebecca, April 2nd, 2013

It’s me.

I didn’t plan to formally say this, but I also didn’t plan to take a break for as long as I did. So, yeah I needed a blogging break.

I hate to bog you all down with the “I’m busy”, woe-is-blogger type of posts, but I also know that many of you can relate. I’ll start out by saying that being a working parent is hard, scratch that, being any parent is hard. Mommy guilt is a killer. I’ve said it before when my maternity leave ended and it’s gotten better in a lot of ways. But in many others ways, it’s still hard. This blog is one of those ways.

I still struggle with how to fit this blog into my “new” life. Don’t get me wrong, me, myself and I love everything about what I write here. I will always be watching HGTV, browsing Pinterest and coming up with things to change around our house. That is what I love to do in my spare time. The problem is that it’s not about me anymore.

I went down to part-time in about October, but I still work 30+ hours a week. Two weeks ago, I worked full-time for several days and it sucked. I don’t know how many of you do it. I don’t know how I did it for months. My longer working hours contributed to my break from here, as did some family commitments, technical issues, Easton not sleeping well for a few weeks and just being dang tired and it goes on and on. And repeat. You’ve heard it all before.

Truth is, about 3 Mondays ago I started my week as usual, checked my blog stats and started to plan out my projects and posts for the week.

Monday: Photograph weekend project before Easton goes to bed but not after his dinner or when he’s in clingy meltdown mode

Tuesday: After bedtime edit and upload photos, hoping computer cooperates and doesn’t continually freeze, write post

Wednesday: Work on new project after bedtime

Thursday: Photograph, upload and post? Eh I’m short a day here

Friday: Collapse.

Saturday/Sunday: Scope out new project and work on it during naps/bedtime

As I planned out my week, I got mad at myself for not accomplishing enough over the weekend. “I should have painted x!” “Why haven’t we finished the office?” “We need to get those shelves up!”. I stopped myself for a minute. What the hell am I doing?

I wish this blog was my job, but it’s not. I would love to work hard enough that it is my job, but I know that idea is far fetched. I don’t want this blog (or reading other blogs) to make me feel like I’m not good enough– not working hard enough, not crafty enough, not organized enough. I started to feel like that, so I needed to step back.

This blog is fun for me and if it ever gets to feel like work, I need to step back and take a deep breath. My time with Easton when I get home from work is for Easton. I didn’t go down to part-time to blog or for projects. My weekends are for Easton, not for this blog or projects. If some weekends I have loads of energy and I’m inspired to get things done, then great! If some weekends I just want to take a nap with Easton, then I can’t get mad at myself. Easier said than done, but I am trying.

I’d rather give you posts that I am proud of than posts I threw together because I was tired…or because I had a great weekend with Mike and Easton…or because I was busy rolling around on the playroom floor when I should have been photographing in natural light.

When I had this discussion with Mike a few weeks ago, I asked him why I should keep blogging. His response was a) because you like it and and b) because some day, when we look back, we’ve created an amazing journal. Maybe I don’t post 6 days a week like I did when I first started (say whaaa?), but just like real life, this blog has peaks and valleys. Lately, more valleys than peaks, that’s okay with me. And that’s all it has to be.

photo

  • StumbleUpon
  • del.icio.us
  • Twitter
  • Facebook
  • Google Bookmarks

A Minted Review & Giveaway

59 Comments

Posted by Rebecca, March 12th, 2013

*THIS GIVEAWAY IS NOW CLOSED*

Congrats to entry #1 (whoa!), Ainhoa who said she’d order some business cards or art prints! 

It’s no secret that I love any type of paper product, so when Minted contacted me to try out some of their goods, I nearly died. I have been a huge fan of Minted since discovering them several months ago. They sell invitations, stationery, prints and more designed by a community of designers from all over the world. Their designs are always incredibly creative and modern, which is what sucked me in.

In a bizzare “is this a prank?” series of events, I was asked to review their business cards. I had actually already chosen business cards from Minted a month or so ago when I bought my ticket to the Haven Conference. The last time I went to a blogger event, I told you that I felt like I was the only person without a trendy business card and repeating “the lil house, that’s L-I-L, that could dot com” got old after about 10 times. In an attempt to avoid that awkwardness again, I knew I needed cards and I played around in Minted. Now I get to share the fun I had officially 🙂

I browsed every single business card they sell to make sure that my favorite was still my favorite. They sell so many great options that it was hard to choose.

minted business cards

Clockwise from top right: Real Simple, Pique Chic, Collegiate, Mustard Stripe, Steelfish and Bar Graph

In the end, I stuck with my first instinct, the Real Simple business card. It’s the gray striped one up at the top and the one I’ve had saved to my phone for the past couple of months.

Even though I loved the original design, whenever I order stationery products I like to customize them. I decided to go with the silver color scheme (out of 3 to choose from) and the pearlescent paper. I liked the idea of a little bit of shimmer in my business cards. A hedge fund CEO may disagree…I worked for one once, no shimmer in his business cards, but a private bathroom in his office…

I think a lot of people don’t realize that it is possible not just to choose colors, paper and edit text, but to change fonts and sizes as well. Minted makes it super easy to click around and personalize your product…

Screen Shot 2013-03-12 at 10.07.46 PM

FYI, not my real last name.

I changed my name to the green color and chose a fun, scripted font. I also made it larger and changed the font for the title of my blog. I added an additional line so I could squeeze in my phone number. Mike told me I should do this, I was all like “What? Can’t people just tweet me?”

After a few minutes of tweaking, I then chose what I wanted on the back. My options were white, solid gray, a thinner stripe, a photo or a logo. None were extra to add, so I went with the thinner stripe and voila, all done and just ordered!

Screen Shot 2013-03-12 at 10.04.18 PM

Now here’s the fun part for you guys, Minted is giving one lucky reader $50 towards ANY purchase on their site!!

Incase you’re not looking for business cards, I went through the rest of the site and pulled out some of my favorite designs. I tried to pick at least one item from each thing they sell, so it appeals to everyone. I told you paper was a guilty pleasure of mine, it was like browsing Pinterest…

minted roundup

Clockwise from top right: Urban Baby Circle Garland, Devon Birth Announcement, Train of Blocks Print, Vintage Keys Print, Stripey One Year Old’s Children’s Birthday Party with Skinnywrap Address Label, Paris Lights Wedding Invitation, Birthday Gig Invitations, Passing Notes Wedding Invitations

Here’s how you can get some of this stuff…

  • One reader will win $50 to Minted.com
  • To enter, simply comment on this post with what you’d order with your $50 if you won

And the rules…

  • Only one entry per email address is allowed
  • Open to international readers
  • A winner will be chosen using Random.org
  • This giveaway closes on Monday, March 18th at midnight. Any entries made after that time will not be counted.
  • A winner will be announced on Tuesday, March 19th so check back in exactly a week!

Good luck and happy paper browsing 🙂

Disclaimer: I received a credit to purchase business cards in an exchange for posting a review of Minted.com‘s business card customization process. All opinions expressed are mine.

  • StumbleUpon
  • del.icio.us
  • Twitter
  • Facebook
  • Google Bookmarks

A DIY Play Tent

17 Comments

Posted by Rebecca, February 27th, 2013

I mentioned a couple of weeks ago that we wanted a play tent for Easton and that we were hoping to DIY one. Well, with the Young House Love, Bower Power, Decor and the Dog and The Remodeled Life Pinterest Challenge tomorrow, I figured it was the perfect opportunity to make one. I love a deadline and I need pressure to motivate me, which is why I always look forward to these challenges. You know that saying…if it wasn’t for the last minute, nothing would get done? My life.

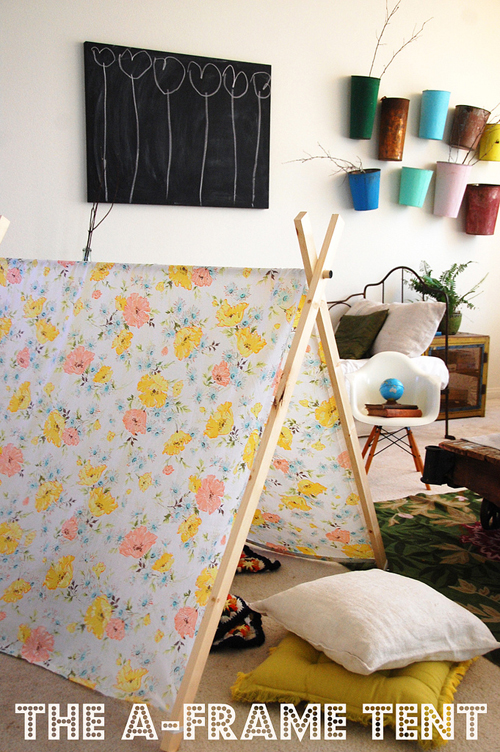
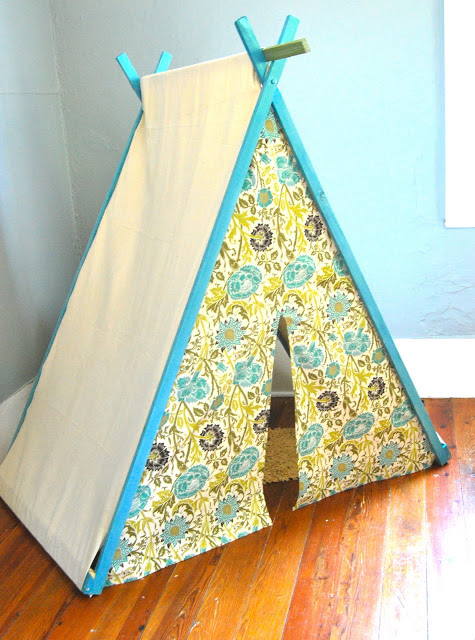
I started searching for some ideas a few weeks back. My goal was to make something as simple as possible. No sewing, minimal cuts if any, and I really didn’t want to paint or stain (spoiler alert: I ate every one of these words). My original inspiration was this tent from Cakies

5697877601_6db2dfc37e_b

(from Cakies via Pinterest)

But as we actually planned to make our own, I decided to look around for some other inspiration. I found this one from The Feminist Housewife

DSC_0004

(from The Feminist Housewife via Pinterest)

And this one from Under the Table and Dreaming

100_4406

(from Under the Table and Dreaming via Pinterest)

I liked that the first two could be taken apart to be stored, but I liked that the last one used a $3 Walmart sheet. We decided to do a combination of the last two.

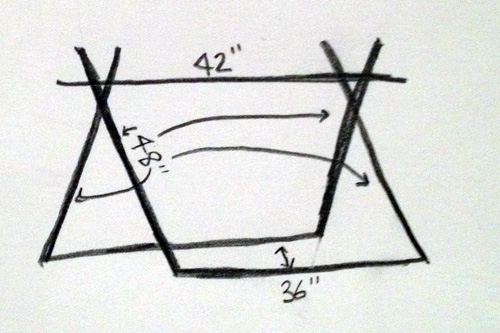
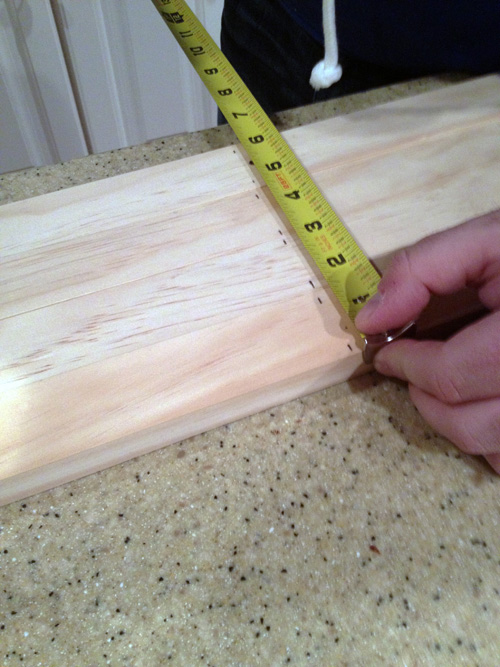
First we planned out the size of our tent. We wanted it to be small, since Easton is well, small, and so is the room. After looking at all of the other tents, we settled on some 1x3x8s cut in half (for the 2 “A” frames”. Once we measured out the sides, we realized that 48″ was too long for us, so we made the side bars 36″. Then we decided to make the top piece 6″ longer to have 3″ of overhang on each side. Confused? I doodled it for you.

tent drawing

We also cut the legs that will be sitting on the floor at a 22.5 degree angle, as per the inspiration plans.

Once we made our cuts, I gave everything a good sanding. Oh and we bought pine rather than cheaper wood so that it would be a little smoother and would cut cleanly. I sanded down the harsh edges to make sure everything was safe for Easton. Then Mike clamped the wood to our island. No work table? Just use the kitchen (though we made cuts and sanded in the freezing garage).

IMG_7026_x500

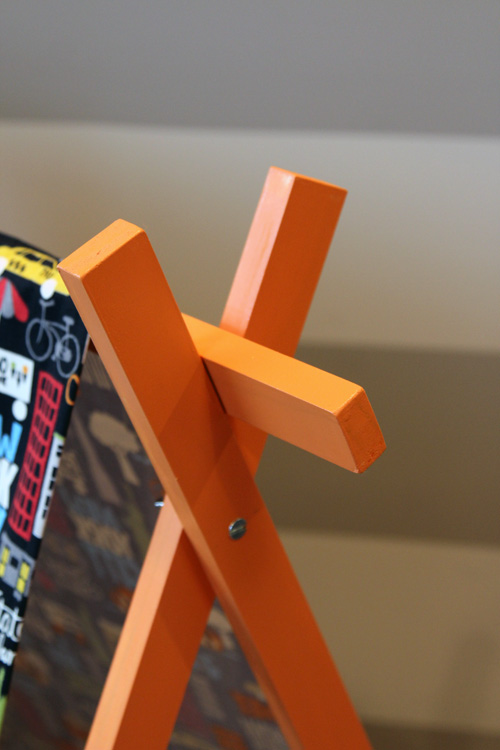
He measured down about 7 inches to drill.

photo-378_x500

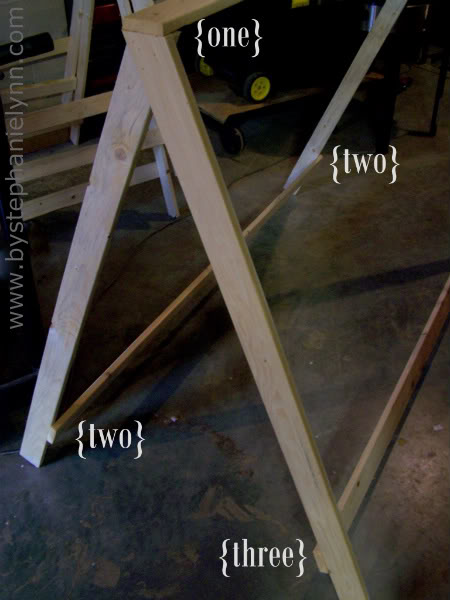
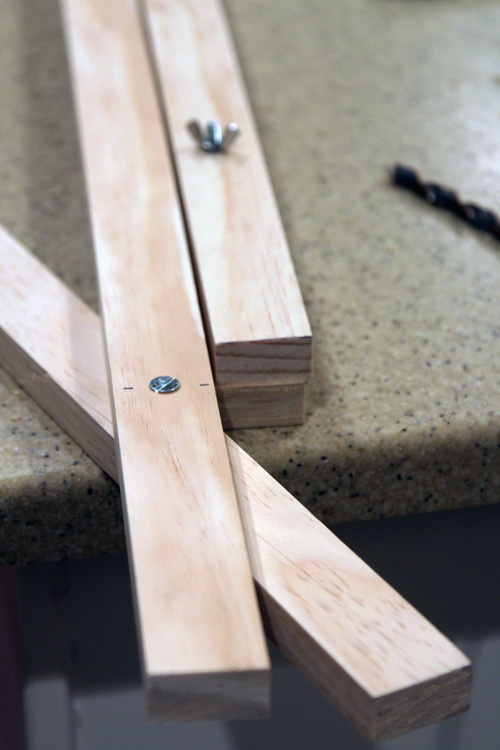
Then used these bolts and wing nuts to attach two of the pieces together.

IMG_7032_x500

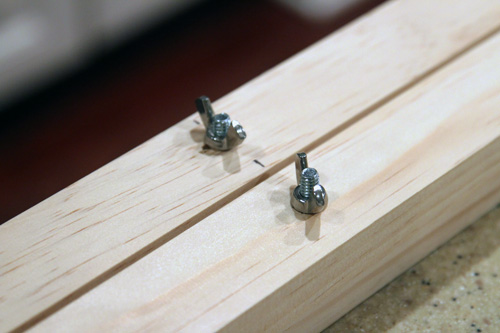
We spread them out and tada! The ends of our tent.

IMG_7039_x500

We then took everything apart because we decided to paint the frame.

photo-375_x500

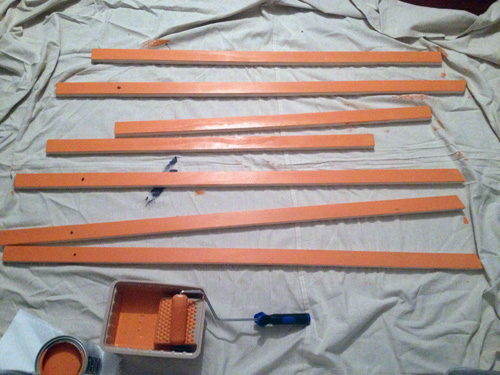
I went with Olympic One Paint + Primer in one semi-gloss in Orange Poppy and rolled it out to eliminate brush strokes.

Somewhere in the midst of this process, we realized that since we shortened the sides of the tent from the plans that I pinned, we could no longer use a twin bed sheet. I painted the frame orange because I figured I’d have to get a solid color sheet and I wanted some interest, and now the sheet won’t even fit?? I debated whether to still get a sheet and hem tape it up, but I figured if I was doing that, I might as well just pick out some fabric.

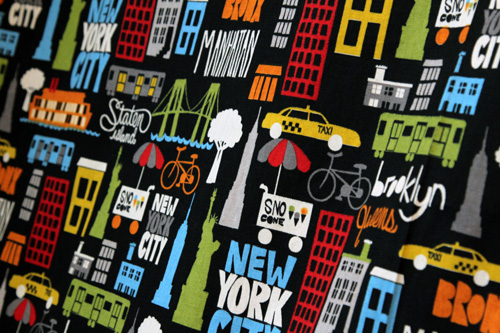
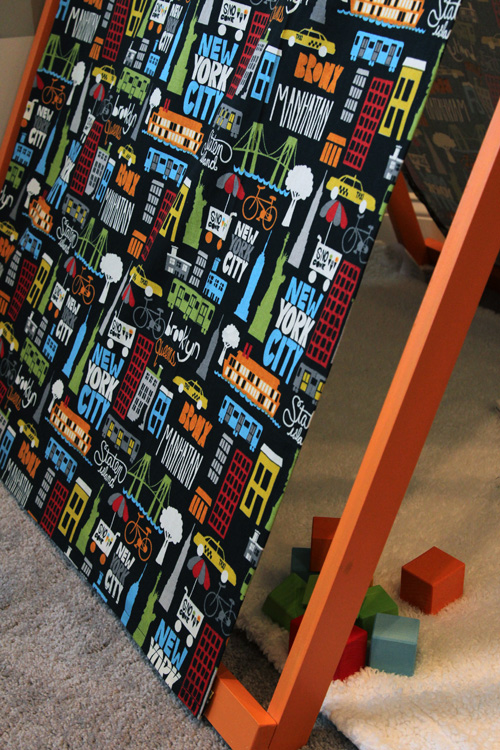
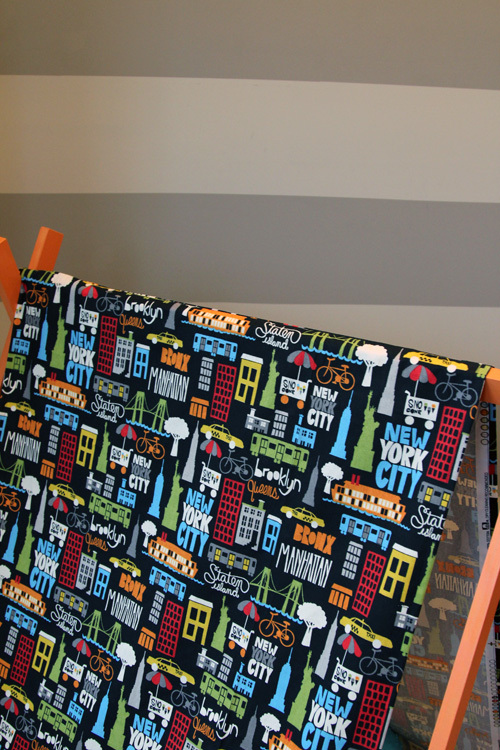
So we headed to Joann fabric and picked out fabric. We were both immediately drawn to this fun New York themed print that matched the grays in the striped walls, and somehow also matched the orange frame we had already painted the night before. We bought 3 yards at $5.99/yard. More than that $3 Walmart sheet, but totally worth it.

IMG_7057_x500

Long story short, we picked a fabric that ran in one direction and would have driven me crazy if I kept it in one long piece. I figured I needed two panels to change the direction of the fabric to be right side up on both sides of the tent. Then I had to face a reality…

I should probably sew all of this.

Yes, you read that right. I have had a brand new sewing machine sitting in the garage for 3 years because it was intimidating. The last time I sewed was 7th grade and I had no clue how to thread a machine these days. I set aside Sunday night (before the Walking Dead, of course), to set up the machine and thread it. And you know what? It was easy. I got it threaded and running in no time.

photo-382_x500

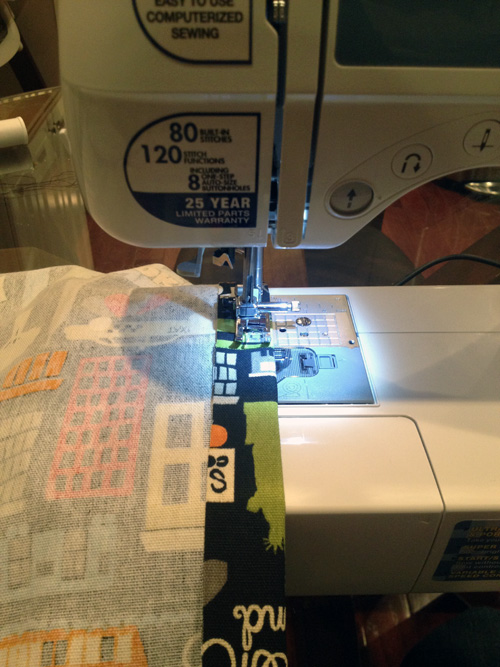
I hemmed all of the edges of the two panels and then sewed them together for the peak of the tent. It honestly took more time to pin everything. Why didn’t I open that sewing machine sooner?

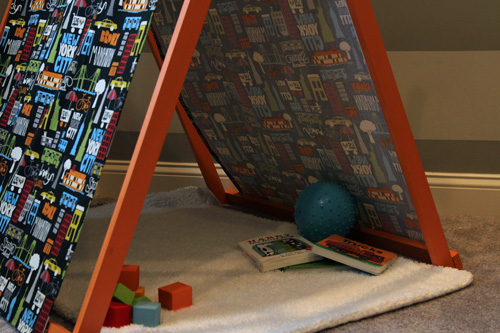
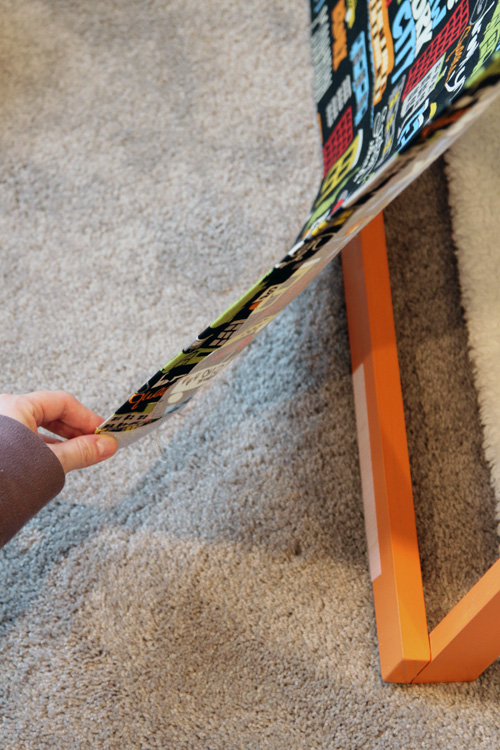
We didn’t take pictures of this part, but we screwed the bottom pieces of wood into the frame and also secured it with wood glue. To attach the fabric to the frame, but make it removable to change up and wash, I decided to use 3 velcro strips on each side that were about 6 inches long.

photo-379_x500

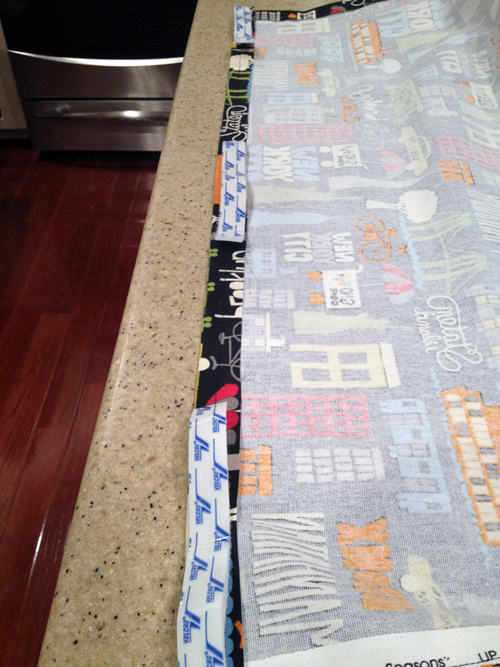
I attached them the same way I did for our no sew crib skirt. I used iron on fabric velcro on the fabric and then sticky back velcro to attach to the tent. I kept the two pieces of velcro together on the fabric, peeled the sticky paper, and then stuck it to the frame.

photo-380_x500

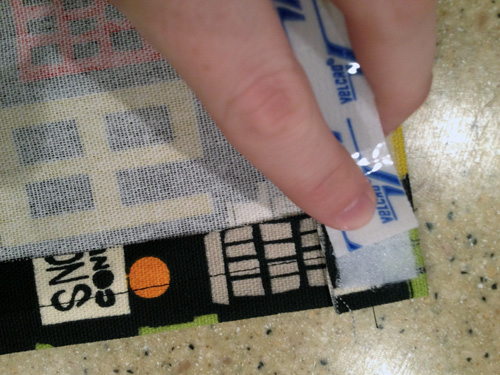
It made it much easier to make sure everything lined up nice, rather than sticking the velcro to the frame and hoping it lined up with the fabric well!

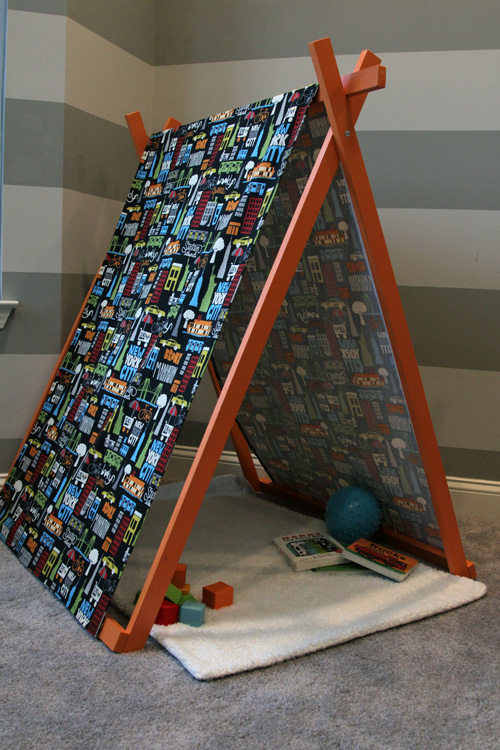
Once the fabric was all attached to the frame, we were done!

IMG_7049_x500

IMG_7044_x500

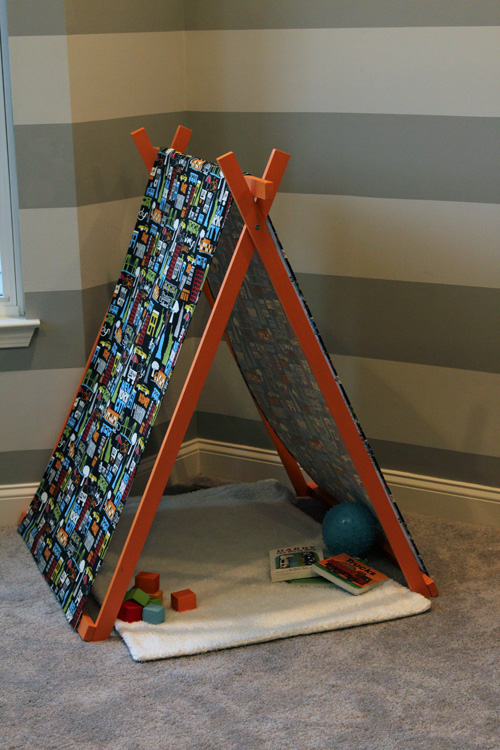
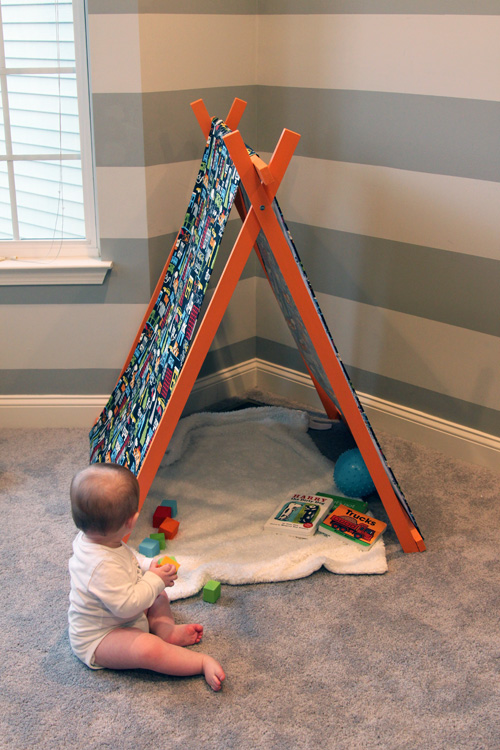
I love how it turned out, granted I could have made the fabric slightly wider so that there was less of a gap between it and the wood, but I guess I measured that wrong. Measure twice, cut once… I definitely did not. But it’s only an inch or so, no biggie.

IMG_7055_x500

One thing we definitely will be adding are some additional supports. The way it is is NOT sturdy enough for a 9 month old. The other plans didn’t emphasize this much and one mentioned anchoring it to the wall. We will be adding additional support along the back and possibly anchoring it to the wall as well.

IMG_7042_x500

The velcro worked out well and attaches/reattaches really easily without getting the fabric bunchy or anything.

IMG_7059_x500

IMG_7097_x500

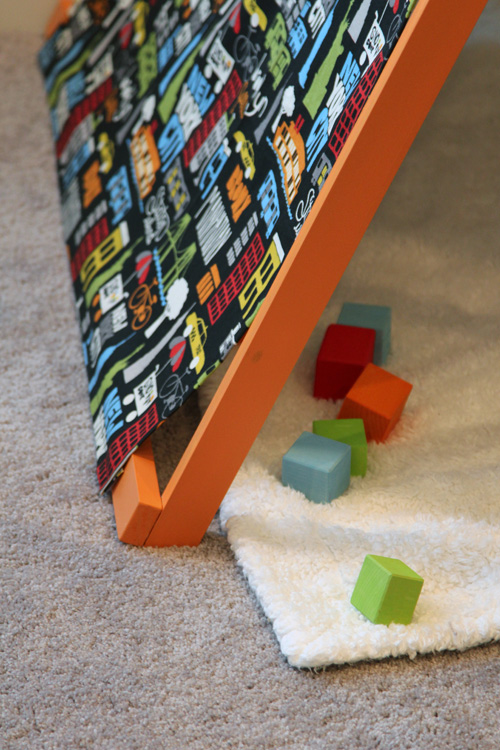
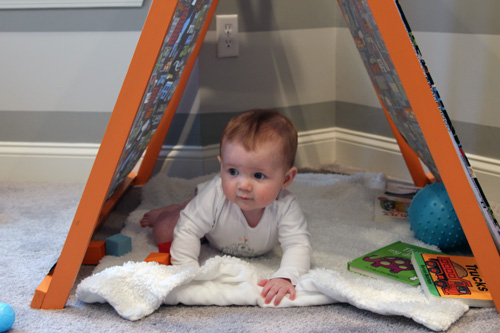
The extra 6 inches we added to the center support measurement worked out perfectly. It just rests along the top.

IMG_7094_x500

The fabric ties into the stripes well and brings in the fun element we’ve been missing in this room. It seemed as though everything we’ve wanted to add has come across as mature. The colors in the fabric are so perfect that they seem to match all of Easton’s toys. I literally picked the blocks, books and balls up off the floor and moved them over a foot into the tent, and they just coordinated. It’s a really easy fabric to work with!

IMG_7114_x500

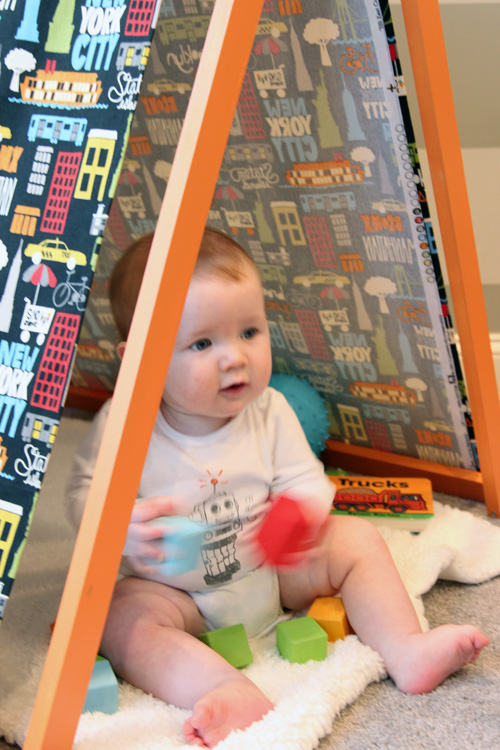
So the verdict? The little guy was overtired when we finally showed him his tent, but he still checked it out on his own.

IMG_7075_x500

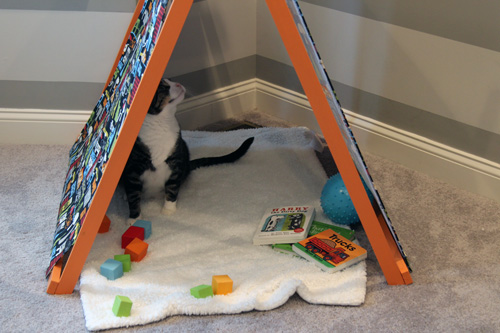
Of course, Macky loved it even more.

IMG_7091_x500

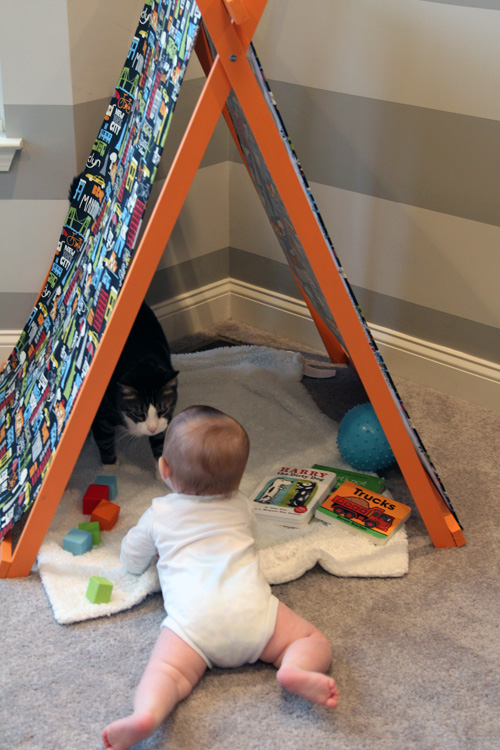
But Easton loves Macky so he wanted in on the tent too.

IMG_7104_x500

In the end, we all love our tent. I can see Easton laying in here with his books like he currently does under his jumperoo.

IMG_7112_x500

IMG_7124_x500

IMG_7129_x500

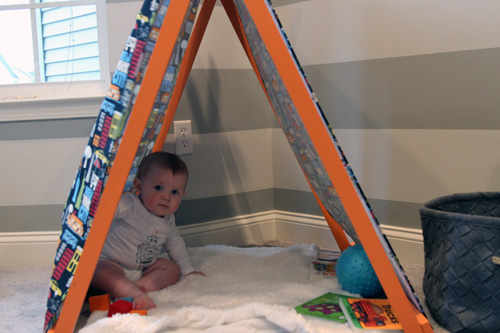
It makes the corner of the room feel so cozy and it’s the perfect miniature size.

IMG_7136_x500

Yes, we still need to touch up the paint from where we removed the previous shelves last week, but guys, I sewed and I survived. I’m going to take a day or two to enjoy that sweet victory.

ps- Here are the supplies we used in list form as a quick reference…

2- 1x2x8 boards, cut in half

2- 1x2x6 boards, one was cut in half, one was cut to 42 inches

2- bolts with wing nuts

4- long wood screws

Wood glue

3 yards of fabric

Velcro (both iron on for fabric and adhesive for wood)

Paint (if you want to paint the frame)

Two nights of a few hours of work… cutting and painting of the frame one night and the fabric the next

And please, if this is for a very young child, consider adding some additional support and/or anchoring it to the wall, we will update you when we do.

  • StumbleUpon
  • del.icio.us
  • Twitter
  • Facebook
  • Google Bookmarks
Copyright 2010 - 2011. The Lil House That Could. All rights reserved.